
Colour Profiles
Download Profile
First, download and unzip the profiles for lab printing.
 Fuji 570 Supreme Gloss
 Fuji 570 Supreme Lustre
Installation
Install your Lab profile in the following location, depending on your operating system:
- Mac OS X: /Library/ColorSync/Profiles
- Windows 2000/XP/7: \Windows\system32\spool\drivers\color
- Windows 98/ME: \Windows\System\Color
Photoshop
Within Photoshop there are a number of ways you can choose to use the profile.
Edit your image
Edit your image until you are happy and save the file. Do all your editing in a standard working space such as Adobe RGB or sRGB, not a printer profile. Working spaces are designed for editing, printer spaces are not. At this point you have an image that can be printed on any printer.
Duplicate your image
Make a duplicate of the image and place in a separate folder. This allows you to keep the original as a printer-independent version, which can then be formatted for any other output medium.
Proof View
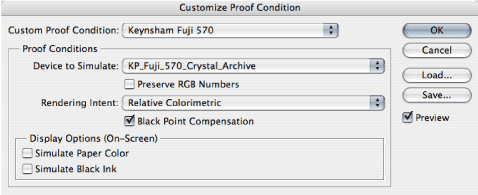
When working with a new lab, it is worth using "Proof View" to help decide what Rendering Intent to use. In Photoshop, go to:
View / Proof Setup / Custom
Select your lab's profile from the "Profile" menu. Uncheck Preserve Colour Numbers, Paper White and Ink Black. Set the Intent to Perceptual and toggle the "Preview" button whilst observing your image for any changes due to "Out of Gamut" colours. Now set the Intent to Relative Colorimetric and repeat the above to decide which Intent is best for your image.

Click "Cancel" NOT "OK" as you could convert to the lab profile twice.
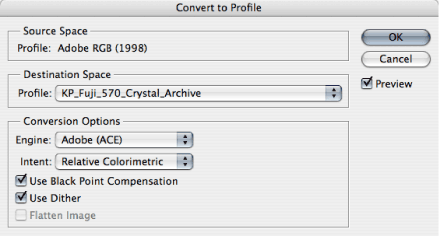
Convert Image to Profile
Finally, convert the image to the appropriate profile, using your chosen rendering intent:
- Image/Mode/Convert to Profile (for Photoshop 7 or CS)
- Edit/Convert to Profile (for Photoshop CS2).
Our Fuji 570 printer does not read embedded profiles, so the image data must be converted. This changes the data in the file to compensate for how our lab's machine actually prints colours.

Save the Image
Finally save image for lab printing.